Types of Consoles
There are many types of lighting consoles, for different purposes.
Most fall into one of these categories.
|
Manual Consoles:
|
The simplest board you are likely to encounter is a manual two-scene preset board.
This console has two or more rows ("presets") of faders
and a crossfader to transfer control from one preset to another. The crossfader is usually "split"
-- a double fader which can be moved as one or separately, each side controlling one of the presets.
If the double faders are both at the top, the top preset controls the lights. Moving both faders to the
bottom transfers control to the bottom row. In this way a set of intensities may be arranged on the top row,
and another state on the bottom row, and a smooth transition achieved between one lighting state and another.
|
|
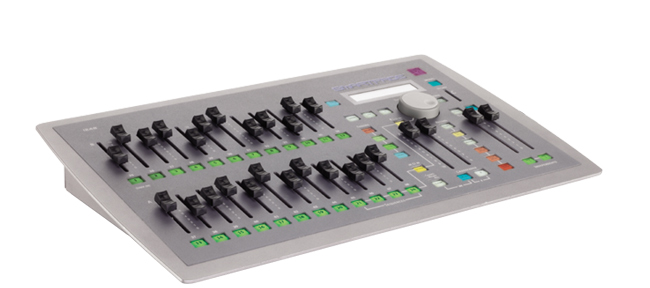
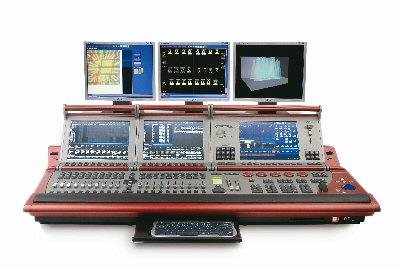
Electronic Theatre Controls SmartFade®
|
However, we don't always want this: sometimes
we want the new state to enter at one speed and the old state to disappear at a different speed.
For instance, the top row might be a state with light on the left side of the stage, and the bottom
row might have the focus on the right. We want the right side to appear before the left side
disappears. Therefore we begin with both faders at the top, and only move ONE of them down, thus
bringing in the new state, and later bring the other one down to join it, fading out the old state.
Manual lighting boards in the past often had a great many presets; sometimes there were two board
operators, one to set up the new presets and another to execute the crossfades. Boards with many
presets might have a master controlling each one. The development of lighting computers and their
relative affordability in recent years has rendered this type of board nearly obsolete; however,
simple two-scene preset boards are still found in small venues. Many of these have the ability to
program automatic timed fades and chasers as well.
|
|
Computerized Consoles:
|
There are two basic types of computerized boards (also still,
occasionally, referred to as "memory" consoles):
those intended for moving lights and those intended for conventional fixtures. There are many different
types of boards, but they have a few basic functions in common:
- Editor - a panel where the operator calls up channels, sets their intensity, records
the set of intensities as cues, programs the timing of cues, assigns them text if desired, and so
on. Most boards have a numerical keyboard as well as buttons for "channel," "memory," "time" and
various other functions for which immediate access is needed. In addition there are usually one or more menu keys,
enabling access to more complicated and less urgent functions such as soft patch.
|
|
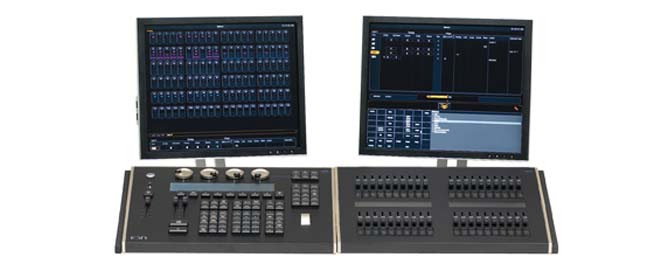
Electronic Theatre Controls Ion®
|
- Playback – one or more sets of split crossfades (just like in the manual board) along with
buttons, so that cues may be executed either with pre-recorded timing by pushing the "go" button, or
manually by moving the split crossfade. There is invariably some kind of manual override if a cue is
done automatically. The crossfaders might take over from the automatic fade, and some boards also have
buttons for "hold," to stop a cue, "back" to take it back to the previous cue, and so on.
- Manual faders – a set of manual faders for immediate access during the performance. This is
useful in improvisatory situations, where there might be an MC, musicians etc. Sometimes it's also
useful in theater applications to have some of the control channels immediately at hand, rather than
everything recorded. At the very least there might be audience lights, work lights, a smoke machine,
etc. that we might want to control at will.
- Effects – possibility to program chasers etc.
- Patch – usually within the menu function, since this is not usually
needed during the performance. This function enables the operator to
route different dimmers to different control channels, and
other more complicated possibilities.
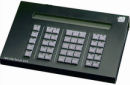 Remote Focus Unit, or "RFU" (pronounced "ARE-foo") – Depending on the console,
this unit enables the designer or electrician, in the house or onstage, to bring up
channels or dimmers, run cues, and many other functions, without requiring an operator
to sit at the console itself. Remote Focus Unit, or "RFU" (pronounced "ARE-foo") – Depending on the console,
this unit enables the designer or electrician, in the house or onstage, to bring up
channels or dimmers, run cues, and many other functions, without requiring an operator
to sit at the console itself.
Moving Lights:
|
|
|
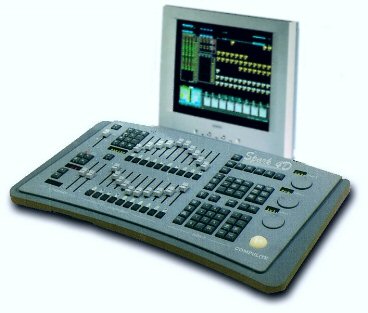
Compulite Spark 4D®
|
One computerized lighting instrument will have several control channels; these could range
from 4 to more than 30. Two channels control movement (front/back, left/right axes). Another
channel controls intensity, three more might control color by inserting cyan, magenta and
yellow filters for example. Another channel might control a wheel of gobos. It would be much
too cumbersome to plot all these as different channels with intensities (although it is certainly possible).
So a control board for moving lights is already programmed to identify all these as belonging to one
instrument, and the operator will key in "spot 1" and then access the different functions. There might be one
wheel for intensity, three wheels for color (CMY), another to change gobos, and so on. Generally there would be
a joystick or similar device for plotting the movement.
Cues too will be more complicated, because we might not want all the functions to change at the same speed. So there
is much more need in such boards for splitting a cue into parts, thus separating a cross fade into several different
plotted times.
Beyond this, different boards have many different functions. There are all kinds of ways to plot chasers, to grab
hold of a group of lights and move them at once, and so on.
|
Concert Boards:
|
Control boards for music are different in concept. The lighting is generally much more dynamic than
for theater, with far more movement and change. There is also more demand for immediate manual operation.
As a result, concert boards have more manual faders than theater boards. Nearly all of them have a
"page" button, which enables the manual faders to change content. A typical board might have
20 manual faders. These would be assigned groups of lights, moving lights, or lighting states, recorded
as "page 1." Another set of intensities would then be recorded as page 2, and so on. During
the show, pressing the page button switches the fader assignment from one page to another. Each song
might have its own page, so that each song could have its own set of looks.
Another difference from theater is that music boards often require a more complicated system
for chases. The Avolite Diamond has an "unfold" function, where a chase is assigned to a
certain fader, and "unfold" spreads each step of the chase out onto all the different faders
so that they can be changed at will, and then "folded" up again to the assigned fader. There
will also be buttons enabling other chase functions, such as "solo", which turns off all
instruments other than the one on the specified fader.
|
These different types of boards have affected each other. Theater boards have incorporated many of
the complicated timing functions required for concert lighting and moving lights. Concert boards
have taken on memory functions once used only for theater. And so on. . . .
|
|
Compulite Vector Red®
|
|
|
Console Functions
Lighting control boards today come at many levels of complexity
and in many forms, but there are basic functions that are common to most.
|
Tracking, Tracing, Cue-Only, and Blocking:
|
Two functions with which lighting designers should certainly be familiar are
"tracking" and "cue-only." These are best explained by example, so let's
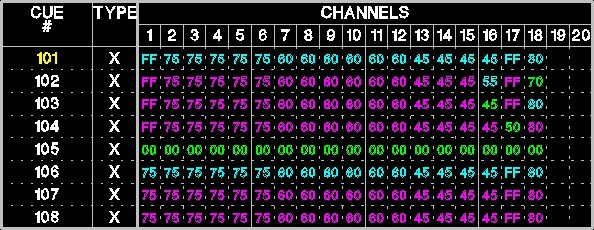
look at this cue sheet:
 While each brand of console (and sometimes different models by the same
manufacturer) will differ, let's assume for the sake of discussion
that the highlighted cue number indicates the cue that is currently
"live" on stage, and that blue channel levels indicate that those
channels are at a higher level than they were in the previous cue
(think "blue" for "sky") and that green channel levels are lower than
they were in the previous cue (because grass, after all, is green).
In our example, magenta numbers indicate levels that have not changed.
Let's also assume that cue #101 is the first cue in scene #1, that cue
#105 is a blackout and the last cue in scene #1, and that cue #106 is the first cue
of scene #2.
Let's say, now, that you, as the lighting designer, want channel #1
to be a little brighter, so you raise it to 100% and record or update
it. If you are in "cue-only" mode, the cue sheet now looks like this:
While each brand of console (and sometimes different models by the same
manufacturer) will differ, let's assume for the sake of discussion
that the highlighted cue number indicates the cue that is currently
"live" on stage, and that blue channel levels indicate that those
channels are at a higher level than they were in the previous cue
(think "blue" for "sky") and that green channel levels are lower than
they were in the previous cue (because grass, after all, is green).
In our example, magenta numbers indicate levels that have not changed.
Let's also assume that cue #101 is the first cue in scene #1, that cue
#105 is a blackout and the last cue in scene #1, and that cue #106 is the first cue
of scene #2.
Let's say, now, that you, as the lighting designer, want channel #1
to be a little brighter, so you raise it to 100% and record or update
it. If you are in "cue-only" mode, the cue sheet now looks like this:
 This is fine if you only wanted to raise the level for the current cue
(which may, indeed, be what you wanted), but if your intent was to
brighten it for every cue in the entire scene, then you need to
manually make the change in every cue, or you can make it once
in "tracking" mode, in which case the cue sheet would
look like this:
This is fine if you only wanted to raise the level for the current cue
(which may, indeed, be what you wanted), but if your intent was to
brighten it for every cue in the entire scene, then you need to
manually make the change in every cue, or you can make it once
in "tracking" mode, in which case the cue sheet would
look like this:
 As you see, recording (or updating) the cue in "tracking" mode
caused the console to raise the channel #1 level from 75% to 100% in every
successive cue until it reached a cue in which it was going to change
anyway.
Now let's say that you want to add channel #19 (at 35%) into every cue in scene
#1. Obviously, we can track it the way we did with channel #1, right?
Let's see:
As you see, recording (or updating) the cue in "tracking" mode
caused the console to raise the channel #1 level from 75% to 100% in every
successive cue until it reached a cue in which it was going to change
anyway.
Now let's say that you want to add channel #19 (at 35%) into every cue in scene
#1. Obviously, we can track it the way we did with channel #1, right?
Let's see:
 Ooops. Look at cue #105. We seem to have tracked channel #19 right
into our blackout, through it, and into the following scene.
Fortunately, most consoles give us a way to
avoid doing such things.
Let's get into our time machine and travel back to a moment before
we added channel #19, and let's protect cue #105 (our blackout). We
do this by changing the cue "type" to that which some consoles refer
to as an "Allfade" and others refer to as a "Blocking Cue":
Ooops. Look at cue #105. We seem to have tracked channel #19 right
into our blackout, through it, and into the following scene.
Fortunately, most consoles give us a way to
avoid doing such things.
Let's get into our time machine and travel back to a moment before
we added channel #19, and let's protect cue #105 (our blackout). We
do this by changing the cue "type" to that which some consoles refer
to as an "Allfade" and others refer to as a "Blocking Cue":
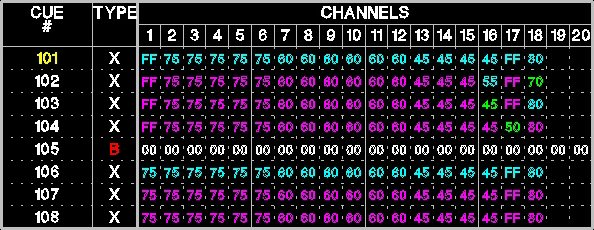 Notice how the "Type" column now lists cue #105 as a [B]locking cue,
and the color of the zeros has changed. Note also that channels #19
and #20 now are listed at zero rather than being blank. Now we can
go into tracking mode, make our change, and it will look like this:
Notice how the "Type" column now lists cue #105 as a [B]locking cue,
and the color of the zeros has changed. Note also that channels #19
and #20 now are listed at zero rather than being blank. Now we can
go into tracking mode, make our change, and it will look like this:
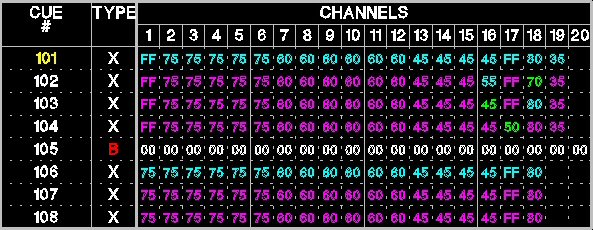 As you see, changing the channel level while in "tracking" mode
causes the new level to change in each successive cue until it gets
to a blocking cue or a cue in which the level was already going to
change.
Some consoles, such as ETC's Expression line, are cue-only by default.
Other consoles (ETC's Ion, Element, and almost any console manufactured
by Strand) default to tracking mode, but can easily be changed. Which one is
best is a matter of personal taste and working style, but you, as a
designer, should become familiar with both.
Many consoles offer a "trace" function, which works like tracking, except backward.
As you see, changing the channel level while in "tracking" mode
causes the new level to change in each successive cue until it gets
to a blocking cue or a cue in which the level was already going to
change.
Some consoles, such as ETC's Expression line, are cue-only by default.
Other consoles (ETC's Ion, Element, and almost any console manufactured
by Strand) default to tracking mode, but can easily be changed. Which one is
best is a matter of personal taste and working style, but you, as a
designer, should become familiar with both.
Many consoles offer a "trace" function, which works like tracking, except backward.
|
|
Submasters:
|
A submaster is one or more channels, recorded at proportional levels, which are controlled
as a single unit. Submasters are usually controlled by physical sliders; some consoles also
allow the user to control them via the numeric keypad. Often, the slider will be associated
with a "bump" button – a momentary switch which, when pressed, brings the submaster
to full. Modern consoles have multiple submaster "pages"; a given slider will control a variety
of submasters, depending on which page you've selected.
There are several types of submasters:
- Pile-on, or additive: The most basic type of submaster. Simply set the channels
at the levels you want and record the submaster. Raising the level of the slider brings the
channels to their prerecorded levels.
- Inhibitive: Sets a proportional limit for the affected channels. For example, if you create
an inhibitive "sub" with channel #60 at 100%, as long as the slider is at full, channel #60 will
perform normally, as recorded in your cues. If you take the slider down to zero, channel #60
will not come up, no matter at what level it's recorded in the cues. If you take the slider
to 50%, channel #60 will always be at one half of the level at which it's recorded.
In general, inhibitive subs override levels set in cues and in additive submasters, but not levels set by
the numeric keypad. One common use of inhibitive subs is in cases in which the houselights
are controlled by the console, instead of by an external controller. the inhibitive sub
provides the operator with a safety mechanism should the houselights accidentally be recorded
into an inappropriate cue.
- Effects: Effects subs hold chases or other effects cues (see the operating manual
for your specific console). These effects may be triggered by raising the level of the slider,
pressing the bump button, or – in the case of some consoles – by a macro linked
to a cue.
Each submaster can be individually assigned whichever type the user needs.
|
|
Effects:
|
A cue or submaster which causes a group of channels to cycle through a sequence of
pre-established levels is called an "effect". There are several types of
effects and each console handles them differently. The most often used type
is the "step" effect. It is common to all modern consoles (although style
and terminology may differ from console to console) and is what we discuss
in this chapter.
A step effect operates by transferring control sequentially from one collection
of settings to the next. Each collection of settings is a "step" and in this
discussion, we refer to whichever step currently has control as the
"active" step.
Each step has several elements:
- Positive/Negative/Alternate: In a positive effect, the channels in the
active step are at their "high" levels and the channels in the inactive steps
are at their "low" levels.
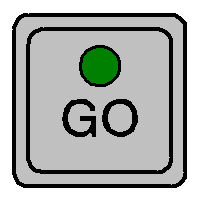
Hover your mouse over the "GO" button for an
example of a positive effect. Imagine that the yellow
circles are lamps with their intensities set at 100% (the "high", or "On",
level for this effect) and that the gray circles are lamps that
are at 0% (the "low", or "Off", level):

 In a negative effect, the active channels are at their low
levels and the inactive channels are at their high levels.
Hover your mouse over the "GO" button for an
example of a negative effect:
In a negative effect, the active channels are at their low
levels and the inactive channels are at their high levels.
Hover your mouse over the "GO" button for an
example of a negative effect:

In an alternate effect,
the cycles switch from positive and negative and then back again.
- Step Number: Each step has a unique number, and is edited individually.
- Channel: The channel (or channels) which will be controlled by this step,
when the step is active. Depending upon the individual console, for the effect
to work properly, it may be necessary to take these channels out
before running the effect.
- Step Time: The amount of time between the point at which one step is triggered and the
point at which the next step is triggered.
- "In" Time: The amount of time, starting with the step's being triggered, that it
takes for the active channels to fade up to their "high" level.
- "Dwell" Time: The amount of time, starting with the completion of the fade-up
specified in the "in" time, that the active channels remain at their "high" level.
- "Down" Time: The amount of time, starting with the end of the "dwell" time, that it
takes for the active channels to fade down to their "low" level.
- "High" Level: The level to which the step's channels fade when the step is active.
- "Low" Level: The level to which the step's channels fade when another step is inactive.
- Direction: Possible directions include:
- Forward: The steps are triggered in numerical order, repeating until the effect ends.
- Reverse: The steps are triggered in reverse numerical order – from the highest-numbered
step to step #1, repeating until the effect ends.
- Bounce: The steps are triggered in numerical order and then in reverse numerical
order, repeating until the effect ends.
- Build:
- In a positive effect, all channels begin at their low levels. As each step
is triggered, its channels come to their high levels, but the channels in
the previous step do not revert to their low levels, remaining at the higher setting.
At the completion of each iteration of the effect, all channels are at their
high levels and are then reset to their low levels as the effect starts its
next cycle.
- In a negative effect, all channels begin at their high levels and as each step
is triggered, its channels come to their low levels. At the completion of each
iteration of the effect, all channels are at their
low levels and are then reset to their high levels as the effect starts its
next cycle.
- Random: The steps are triggered in a random order. This is useful when making lights
appear to twinkle or when creating a fire effect. With most consoles, the speed of a random
effect can also be randomized.
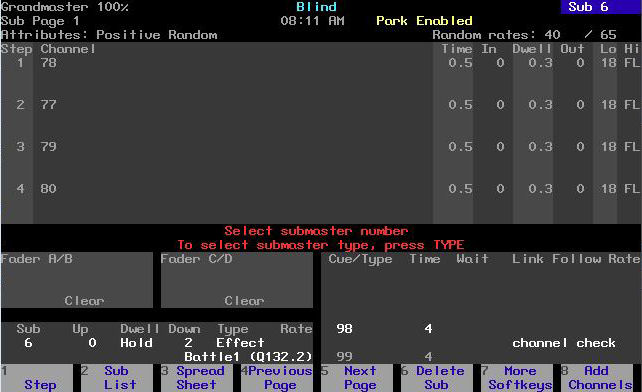
This is the effects editing screen from Electronic Theatre Controls' Express
line of consoles:
|
|
Cue Attributes:
|
On a modern computerized console, each cue can have several properties which can be independently manipulated.
Each console works differently, and different manufacturers use different terminology,
so you should definitely
review the user manual, but the following are typical:
- Blocking: A blocking cue prevents level changes from tracking through it and successive cues.
For a discussion in more detail, see Tracking, Cue-Only, and Blocking.
- Curve: Similar to a dimmer profile (See Patching),
but applies to the changes of levels within a cue. The default, usually, is "linear," and this is what,
most often, you will want, but for some cues, you might prefer, "slow bottom," (in which changes happen
more gradually during the first part of the fade) or some other variant.
- Delay (or Wait): The (optional) length of time (in seconds, after pressing the "Go" button) after
which a cue parameter will begin its fade. The delay can be applied to parameters such as intensity or color,
or to the upfade or downfade
For example, if you want the channels whose intensities are getting higher to start their fade up three seconds
before the channels whose intensities are getting lower start their fade down, you would put a three-second
delay on the downfade.
- Follow/Hang: Frequently, you will want a cue to start automatically after the previous cue has begun or
has completed. Putting a follow time on a cue causes it to trigger the next cue at the specified interval after
the "Go" button has been pressed. For example, If cue #101 has a follow of four seconds, cue #102 will begin
four seconds after cue #101 has begun (even if cue #101 is not yet complete).
Hang works similarly, except that the next cue is triggered after the previous cue is complete. If cue #101
has a hang time of five seconds, cue #102 will begin five seconds after cue #101 has finished its fade, no
matter what the fade time of cue #101 might be.
- Label: The "label" is an alphanumeric description attached to a cue or a cue part. This is handy
for reminding the stage manager, the board operator, or yourself, what an individual cue is meant to accomplish.
Jeff's Note: Often, especially, in a fast-paced situation such as summer stock, I find the "label"
attribute to be a fast, convenient way to communicate cue placement to the stage manager. While I'm
initially programming the show, the board operator or I will enter the page number and "Go" of the cue
into the label field and then print out the cue list for the stage manager.
- Link: At times, you will need to run cues other than in strict numerical order. You (or the director)
might want to "see what it looks like without Q203," or you might be doing a Nutcracker whose Act II
divertissements have been re-ordered. In the first instance, you could delete cue #203, but when/if you (or
the director) decide that the cue was, indeed, necessary, you will have to rebuild it. In the second instance,
you could re-record the cues in the proper, new sequence, but that's a lot of work and a lot of potential for
error.
In either case, the easier, and safer, solution is to "link around" cue #203. To do this, you would set the "Link"
attribute of cue #202 to "204". Then, after running cue #202, the next time you press the "Go" button, the board
will run cue #204. If, afterward, you decide that you really want cue #203, all you have to do is to clear the attribute.
- Loop: Looping allows you automatically to replay a sequence of cues for a specified number
of repetitions. You do this by specifying the cue to which you wish to loop and the desired number
of times you wish to loop.
While similar to "link," looping differs in that after the designated number of cycles, the normal
numerical sequence of cues is resumed.
- Mark: When using moving lights or color changing fixtures, you will usually want every other attribute
preset before the intensity is brought up, so that the audience does not see them changing. This is called,
"marking." Many consoles allow "automarking," which, as the word implies, makes it happen automatically.
- Part: Cues can be recorded in several parts, which, when the "Go" button is pressed, are
then executed consecutively.
- Rate: The "rate" parameter is used to change the relative speed of a cue. It is especially
handy when you want to speed up or slow down a cue whose various attributes have different times
assigned to them.
- Rem Dim: (Stands for, "Remainder Dim").
Sets all non-selected channels to 0% intensity. This is a helpful troubleshooting tool.
- Time: A cue's "time" is a measure of how long it takes the cue to complete, once it has been executed.
Depending upon the console, time(s), entered in minutes and seconds, can be entered for the cue as a whole or,
individually, for transitions in focus, intensity (up and/or down), and color, as well as for individual channels.
Time (or delay) applied to individual channels is called, "discrete" timing.
- Trace: See Tracking, Tracing, Cue-Only, and Blocking.
|
|